FAQs
Rain caps protect the opening of a vertical exhaust stack from debris and water. The flapper of the rain cap lays horizontally across the opening of the exhaust stack when the exhaust stack is not emitting exhaust gas.
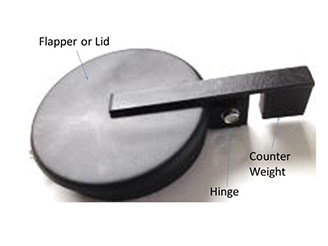
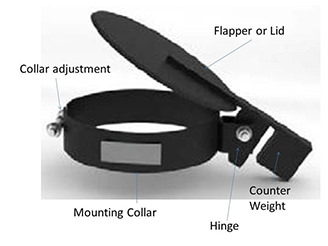
Rain caps are simple mechanical devices comprising of two pieces - a mounting collar and a flapper. The flapper and mounting collar are connected together at the hinge point. On the opposite side of the flapper is the counter weight. This is a piece of metal that weights slightly less than the weight of the flapper or lid. The counter weight allows the flapper to pivot up with very little exhaust pressure coming from the exhaust stack. The mounting collar fits around the outside diameter of the exhaust stack and is tightened into place by the collar adjustment. The collar adjustment is typically a nut and bolt arrangement that when threaded together takes the clearance from the mounting collar.
The differences are the actual outside diameter of each type. Tubing's outside diameter is the actual physical dimension as measured.For example, an 8 inch tube has a physical outside diameter measurement of 8 inches. The dimension associated with a particular pipe size (or Nominal Pipe Size (NPS)) references the inside diameter. For example, an 8 inch pipe has a physical inside diameter of 8 inches, and an outside diameter of 8.5 inches for a schedule 40 pipe.
Since rain cap sizes are selected by the outside diameter of the tube/pipe mounted to, it is important to understand these differences especially if you are receiving information from an end user or field technician.
The process is easy and requires only basic tools.
Rain caps < 8 inch in size:
- Tools: Screw driver and wrench.
- Installation: Loosen the collar adjuster by backing the bolt out of the nut. Place the collar over the outside of the exhaust pipe. Tighten collar adjustment mechanism until the rain cap is lightly snugged up against to the exhaust stack so you no longer need to physically support the rain cap with your hand. Now pivot the rain cap into the proper position and tighten until the rain cap mounting collar is secure to the exhaust stack. Do not over tighten the mounting collar as it may deform thin walled exhaust stacks.
Rain caps 8 inch and larger in size:
- Tools: Two wrenches.
- Installation: Loosen the collar adjuster by backing the bolt out of the nut. Place the collar over the outside of the exhaust pipe. Tighten collar adjustment mechanism until the rain cap is lightly snugged up against to the exhaust stack so you no longer need to physically support the rain cap with your hand. Position the lid or flapper so it covers the exhaust stack opening evenly. While holding the lid in its proper position, tighten the hinge's nut and bolt so it removes any lateral (side to side) movement. Make sure you don't over tighten so that it restricts the flappers vertical movement. Now pivot the rain cap into the proper position and tighten until the rain cap's mounting collar is secure to the exhaust stack.
Proper facing direction of the flapper:
- The direction the exhaust flapper faces depends on application, personal preference and equipment manufacturer's suggestion. For mobile applications such as trucks and tractors, the flapper should be placed sideways or rearward facing. This prevents the rain cap's lid from being exposed to forces generated by the vehicles forward momentum that may cause the rain cap or flapper to be damaged. For stationary applications, it is suggested that the back of the rain cap's lid should be facing the direction of prevailing winds. This will help prevent the rain cap from being opened prematurely due to excess winds. However, the equipment manufacturer's preferred mounting should take be followed if provided.